
Pelvic Floor 101: Why Intra-Abdominal Pressure is the Key to Understanding Pelvic Floor Problems
Understanding how intra-abdominal pressure affects your pelvic floor is key to preventing dysfunction. When your deep core system—including the diaphragm, deep abdominal muscles, and pelvic floor—can't manage pressure effectively, it can lead to issues like incontinence, prolapse, and pelvic pain. Learn about the dynamic piston system between your diaphragm and pelvic floor, common compensation patterns like chest gripping and breath holding, and how poor pressure management creates a cascade of problems throughout your body.
To understand how pelvic floor problems develop, we need to talk about intra-abdominal pressure: this is the air pressure inside your lower trunk and abdominal cavity. When your deep core system is functioning optimally, it can manage this pressure efficiently.
However, when there’s dysfunction in your deep core, pressure management becomes problematic. Over time, poor pressure management can cause a cascade of issues throughout many body systems.
Let’s dive in and learn more about this delicate dance of pressure management and how it affects your pelvic health.
How Pressure Affects Your Pelvic Floor
Think back to the soda can analogy from our first Pelvic Floor 101 article:
Imagine a cylindrical container, like a soda can. Your diaphragm—the primary breathing muscle—forms the top of this container. The cylindrical sides are made up of your deepest abdominal muscle (the transverse abdominis) and your deep spinal muscles. Your pelvic floor muscles form the bottom of this container.
Normal pressure fluctuations occur with this internal canister during everyday activities. Day-to-day occurrences that rely on internal pressure include:
Breathing
Coughing, sneezing, and laughing
Lifting objects
Exercise
Bowel movements
A healthy deep core system manages these pressure changes smoothly. A well-functioning deep core also powers a piston-like action between the diaphragm and pelvic floor. This system is critical for many bodily functions, including your breath—let’s consider it more.
The Dynamic Piston System

When they’re working well, your diaphragm and pelvic floor function as a dynamic piston system, moving up and down together throughout the day. This system helps control normal breathing, a critical life function most people never even think about! Consider the following actions that drive your breath.
When you inhale (breathe in):
Your diaphragm drops down as your lungs fill with air.
This increases pressure within your abdominal cavity.
Your pelvic floor responds by lengthening downward to accommodate this pressure.
Your deep abdominal muscles also expand outward to relieve increased pressure.
When you exhale (breathe out):
Your diaphragm lifts up as air leaves your lungs.
This lifting relieves pressure inside the abdominal cavity.
Your pelvic floor lifts up in coordination with the diaphragm.
Your deep abs recoil inward as internal pressure decreases.
This coordinated movement happens automatically thousands of times per day, providing stability for your spine and pelvis while managing the pressure changes that occur with all manner of daily activities.
However, when dysfunction occurs, even normal pressure fluctuations can become problematic.
When pressure inside your "soda can" increases beyond what your system can handle, something has to give. Often, it's the bottom of the can—your pelvic floor—that bears the brunt of excessive pressure.
Next, let’s discover how problems with pressure management can manifest.
Problematic Pressure Management Patterns
The human body is incredibly adaptable. Typically, your body tries to compensate as best as it can for any deficits or imbalances. If it’s compensating well, you may not even realize that you have an issue…at least for a while.
However, as with any quick fix, these compensatory patterns can disrupt the delicate balance of your body’s pressure management system. Here are a few compensation patterns that people with pressure management problems develop, courtesy of pelvic health PT and educator, Diane Lee.
Shallow Breathing and Chest Gripping If you breathe primarily high in your chest (rather than allowing your diaphragm and belly ) it's like you’re squeezing around the upper third of your soda can. This pattern limits the normal piston action between your diaphragm and pelvic floor, increasing stress on your lower back, lower abdominals, and pelvic floor muscles.
People who chest-grip may notice a persistent "pooch" in the lower abdomen between their belly button and pubic bone.
Breath Holding and Bearing Down (Valsalva Maneuver)
The Valsalva maneuver occurs when you attempt to breathe out against a closed airway. It’s common when people strain during bowel movements or lift heavy objects. This is like compressing the soda can from the top down.
The Valsalva maneuver dramatically increases downward pressure on your pelvic floor. The occasional Valsalva maneuver isn’t a huge deal, but relying on this pattern regularly can put you on a fast track to pelvic floor dysfunction.
Abdominal Gripping
Many people habitually "suck in" their abdominals in a pattern of abdominal gripping. This pattern is like squeezing the soda can around its middle, increasing stress at the top (diaphragm portion) and bottom (pelvic floor portion) of the system.
Back Gripping
This is another compensation pattern that squeezes the soda can around the middle. Back grippers have excessive tightness in the muscles along their lower spines.
People with military or dance backgrounds often exhibit this pattern: they spend years training to “stand tall” and “stick the chest out”, to the point that they struggle to relax the long spinal muscles.
Because a back gripper’s spine is persistently arched, their abdominal muscles are constantly overstretched and weakened. This increases the burden on the other muscles of the deep core canister, including the pelvic floor.
The Consequences of Poor Pressure Management
When your deep core system can't effectively manage intra-abdominal pressure, you may experience a variety of troublesome symptoms. A few examples:
Bowel and bladder leaks: Excessive internal pressure can overwhelm your pelvic floor's ability to keep you continent.
Pelvic organ prolapse: Chronic downward pressure can cause pelvic organs such as the bladder to drop down from their normal positions.
Pelvic pain: Pelvic muscles and other tissues that are constantly under stress can become painful and dysfunctional.
Sexual dysfunction: Altered muscle tension and coordination can affect your ability to enjoy and feel satisfied with sex.
Back pain: Poor pressure management affects spinal stability and can contribute to back problems.
If this all feels like a lot of doom and gloom, don’t panic! While problems like these can develop due to poor pressure management, this doesn’t mean they have to. There’s plenty you can do to prevent compensation patterns from developing (and correct them if they do)!
At Cervu Health, we’re dedicated to help all people with vaginal anatomy manage their pelvic —and whole body—health. We understand the unique challenges facing female cancer survivors, and we’re building tools specifically tailored to those with pelvic floor problems.
We’re here to help, because survivors deserve better.
This article is intended for educational purposes only and should not replace professional medical advice. If you're experiencing pelvic floor symptoms, please consult with a qualified healthcare provider for proper evaluation and treatment.

About the Author
Caitlyn Tivy, PT, DPT, OCS
Dr. Caitlyn Tivy is a pelvic health physical therapist, clinical consultant, and medical writer. As Chief Clinical Officer of Cervu Health, she’s focused on helping Cervu users regain their health and wellbeing after cancer. Caitlyn believes that all survivors deserve compassionate, inclusive care and access to the most effective recovery tools. She specializes in smashing taboos, centering science, and making complex medical topics easy to understand.

Pelvic Floor 101: Muscles and Tendons and Nerves, Oh My!
Your pelvic floor is more than just muscles: it's a complex network of muscles, connective tissues, blood vessels, and nerves that forms the foundation of your core. Understanding the three distinct layers of pelvic floor muscles and their five essential functions (sphincter control, support, stability, sexual function, and lymphatic drainage) is crucial for maintaining optimal pelvic health and preventing dysfunction like incontinence, prolapse, and pelvic pain.
In human health and medicine, few areas are as important (or as misunderstood) as the pelvic floor. Whether you're experiencing symptoms or you're simply interested in maintaining optimal pelvic health throughout your life, understanding your pelvic floor is essential.
At Cervu Health, we believe that knowledge is power. The more you understand about your body's intricate systems, the better equipped you are to recognize changes, seek appropriate care, and make informed decisions about your health.
Today, we're diving deep into pelvic floor anatomy and function to give you the foundation you need to improve and maintain your pelvic health.
What Is the Pelvic Floor?
When most people think about the pelvic floor (if they ever do!), they’re thinking about muscles…but it’s so much more than that! Your pelvic floor is a complex network of muscles, connective tissues, blood vessels, and nerves that form the foundation of your core.
The muscles attach to the base of your pelvis, stretching between your tailbone (coccyx) in the back, your pubic bone up front, and your sitting bones (ischial tuberosities) on the sides. Several types of connective tissue—think ligaments, tendons, and fascia—help to support these muscles. The blood vessels and nerves feed and control the muscles.

Think of your pelvic floor as a supportive hammock that cradles your pelvic organs from below. This "hammock" consists of three distinct muscular layers, each with specialized functions that work together to support your daily activities and overall health.
The Three Layers of The Pelvic Floor
Layer 1: The Outermost Layer The outermost, or superficial, layer contains four muscles that control the opening and closing of all the “holes”. For folks with female anatomy, these are the urethra (where you pee from), the vagina, and the anus. When functioning properly, these muscles:
Relax to allow urination and bowel movements, then contract to maintain continence between bathroom visits.
Allow for sexual function by contracting and relaxing the vaginal opening.
Layer 2: The Middle Layer This intermediate layer also consists of four muscles that assist the outermost muscles and provide additional support. These muscles help to:
Prevent urinary leakage by keeping your urethra closed when you aren’t on the toilet.
Provide structural support to your pelvic organs.
Control movement of the vaginal opening during penetrative sex.
Layer 3: The Innermost Layer The deepest layer contains two muscle groups that work like a supportive sling. These muscles:
Provide the primary support for your internal pelvic organs—including the bladder, intestines, and uterus, if it’s present.
Stabilize the pelvic joints at the base of your spine.
Some of these deep muscles also wrap around the rectum to assist in bowel control.
Helper Muscles
In addition to the three layers of “true” pelvic floor muscles, other muscles in the area assist in pelvic floor function. Think of these as “helper” muscles: pelvic function isn’t their main job, but they provide additional support when your body needs it.
Several muscles of the hips, for example, act as helper muscles. This is why most pelvic health physical therapists examine their patients’ hips: if your hip muscles aren’t functioning well, this can mess with your pelvic floor (and vice versa). It’s all connected!
The Deep Core Canister: How Your Pelvic Floor Connects to Everything
Speaking of everything being connected...your pelvic floor forms part of a larger system that pelvic PTs call the "deep core" or "core canister"—an integrated network of muscles that work together to provide stability and manage pressure within your abdomen and pelvis.
Imagine a cylindrical container, like a soda can. Your diaphragm—the primary breathing muscle—forms the top of this container. The cylindrical sides are made up of your deepest abdominal muscle (the transverse abdominis) and your deep spinal muscles. Your pelvic floor muscles form the bottom of this container.
These muscle groups work together to maintain a consistent pressure inside the container. Ideally, they function as a coordinated team, lengthening and contracting together in response to your breathing and daily activities.
However, if any one of them isn’t pulling its weight, the other groups must pick up the slack. If this goes on for a long time, the muscles doing extra work become fatigued and dysfunctional, while the tuned-out muscles get weaker and less efficient.
The Five Essential Functions of Your Pelvic Floor
Understanding what your pelvic floor does can help you understand why dysfunction in this area can have such wide-ranging effects on your health and quality of life. Your pelvic floor performs five primary functions:
1. Sphincter Control
Your pelvic floor muscles act as sphincters, controlling the opening and closing of your urethral and anal passages. Proper sphincter function allows you to maintain continence when it's not appropriate to empty your bladder or bowels, then relax appropriately when you're ready to go.
2. Support
Like a hammock holding a person between two trees, your pelvic floor provides structural support for the organs inside your pelvic cavity. This support system helps maintain proper organ position and prevents conditions like pelvic organ prolapse, in which organs descend from their normal positions.
3. Stability
Your pelvic floor contributes to core stability, helping to stabilize your pelvis and lower spine during movement. This stability is crucial for proper posture, efficient movement patterns, and injury prevention.
4. Sexual Function
The muscles of your pelvic floor play important roles in sexual sensation, arousal, and orgasm. If you have vaginal anatomy, they contract and relax the vaginal opening: this action contributes to satisfaction and comfort during sex. For those who deliver children vaginally, the pelvic floor muscles are critical to the childbirth process.
5. Sump Pump Function
Perhaps the least known (but critically important!) function is your pelvic floor's role in lymphatic drainage. The repeated contractions of pelvic muscles act like a sump pump, moving lymphatic fluid through channels out of your pelvis. This drainage system reduces swelling, prevents infections, and helps maintain proper fluid balance throughout your body.
Knowledge is Power: The First Step in Your Pelvic Health Journey
Understanding your pelvic floor is the first step toward optimal pelvic health. Whether you're currently experiencing symptoms or working to prevent future problems, this knowledge empowers you to make informed decisions about your care.
Remember that like any other muscle group in your body, your pelvic floor muscles can be strengthened, stretched, and retrained. With the proper guidance and tools, most pelvic floor dysfunction can improve significantly: you don’t have to “just live with it”!
If you're experiencing symptoms such as bladder leakage, pelvic pain, or sexual dysfunction, don't hesitate to seek help. Pelvic health physical therapists and other healthcare providers specializing in women's health can assess your unique situation and develop a treatment plan tailored to your needs.
At Cervu Health, we understand the crucial importance of healthy pelvic floors—and healthy humans. We also understand the unique challenges that female cancer survivors face in managing pelvic floor problems. We’re here to support you with tools to improve your pelvic health, no matter your history.
This article is intended for educational purposes only and should not replace professional medical advice. If you're experiencing pelvic floor symptoms, please consult with a qualified healthcare provider for proper evaluation and treatment.

About the Author
Caitlyn Tivy, PT, DPT, OCS
Dr. Caitlyn Tivy is a pelvic health physical therapist, clinical consultant, and medical writer. As Chief Clinical Officer of Cervu Health, she’s focused on helping Cervu users regain their health and wellbeing after cancer. Caitlyn believes that all survivors deserve compassionate, inclusive care and access to the most effective recovery tools. She specializes in smashing taboos, centering science, and making complex medical topics easy to understand.

Using the Cervu Tool for Internal Self-Massage: The Whys and Hows
Learn how to use the Cervu tool for internal pelvic self-massage to release pelvic floor trigger points, ease tension, and support your recovery after cancer treatment, all with one easy-to-use device.

Pelvic health recovery after cancer is complicated. Depending on the treatments you’ve had, you may be living with scar tissue, muscle tightness, chronic pelvic pain, and other unpleasant symptoms. You need tools that can help you address all of these concerns.
If you’ve discovered you have tight, tender pelvic floor muscles—or if a provider has told you have them—you’re probably wondering how the heck to address them. We’ve got you: we designed the Cervu system specifically to help people release tension and pain in the pelvic muscles.
Let’s jump in and discuss your options for targeting pelvic floor trigger points, including how the Cervu tool can help.
What Is a Pelvic Massage Wand?
If you’ve done any searching to learn more about pelvic floor muscle problems, you may have come across pelvic massage wands.
A pelvic massage wand is a self-massage tool designed to help you access and address tight or tender areas, or trigger points, in your pelvic floor muscles. It’s useful for people living with muscular trigger points that cause pain or tenderness during sex, pelvic exams, tampon use, or even just at rest.
Most commonly, people use wands intravaginally, but it can also be used rectally depending on your symptoms and goals. The wand’s curved shape allows you to reach areas that are difficult or impossible to get to with your fingers or a straight tool.
However, this S-shaped curve of most wands can make them look a bit intimidating. If you’ve seen or held a pelvic wand and found yourself thinking, How do I use this thing?, you’re not alone.
That’s why we designed the Cervu tool the way we did. It gives you the length and angles you’ll need to access hard-to-reach muscle groups, all in a less complicated, less intimidating package.
Why Should I Use the Cervu Tool for Internal Self-massage?
If you’ve already used the Cervu tool as a vaginal trainer, you might be wondering why you should bother to learn to use it like this, too. In short, the two approaches have different intentions and outcomes.
The vaginal training component of the Cervu tool focuses on helping you gently stretch and expand tight vaginal tissues. For female cancer survivors dealing with scar tissue and tension after pelvic surgeries or radiation, this is a critical part of your post-operative self-care.
Pelvic wands, on the other hand, are curved and designed specifically to help you locate and work on sensitive or tight muscle areas inside the pelvis. By releasing tender points in your pelvic tissues, you can reduce pressure sensitivity and the pain these tender points can cause.
If you’ve found vaginal trainers helpful, there’s a good chance you’ll benefit from a pelvic wand, too…but who wants another tool cluttering up their personal space? It’s another step in your routine, another thing to clean and store, another potential headache.
This is exactly the problem we wanted to solve with the Cervu system.
Unlike some other vaginal trainers on the market, the Cervu trainer tips are slightly curved. This is a deliberate design feature: it allows you to use the tip of each trainer like a targeted massage tool. The Cervu tool lets you perform vaginal training and trigger point release with just one tool, in one session.
What’s not to like about simplicity?

Setting Yourself Up for a Good First Experience
If you’ve already used the Cervu tool for vaginal training stretches, this step will be familiar. It can be tempting to rush into a session, but taking the time to settle yourself is perhaps the most important step of any pelvic self-care routine.
Before you begin, always wash your hands and the Cervu trainer tips with warm water and a gentle, unscented soap. Even if it’s your first time using the Cervu tool right out of the package, give it a good rinse.
You’ll also want to have a good quality lubricant on hand. This helps minimize friction and makes the whole process more comfortable. (Check out our lube recommendations in our Getting Started article!)
Start in a private, quiet space where you feel calm and unhurried. This might be your bedroom, or even a cozy spot on the floor with a yoga mat and some pillows. If you’ve used the Cervu tool before, the setup is very similar: support under your head, your knees propped if needed, and your pelvis within reach.
Take a few minutes to settle into your body. Get your pillows arranged so you’re comfortable, and take some deep, slow breaths. Give yourself time to settle into your body.
Starting Slowly and Simply
Attach one trainer tip to the Cervu handle. There’s no right or wrong size to use, though many people find that the middle two tip sizes are the easiest to use for trigger point work.
Before you rush into inserting it, get comfortable with how the Cervu tool feels in your hand. Hold the white handle in several different positions to find what feels most natural.
Allow your body time to get comfortable with the tool, too. Lightly touch the trainer tip to your pubic bone and the outer edges of your vulva. This helps your nervous system start to associate the wand with safe, gentle touch.
When you’re ready, apply a small amount of lubricant to the trainer tip. Gently insert just the very first portion of the trainer tip—no more than half a centimeter. Pause here. Breathe.
Notice how your body is responding. If there’s pain or significant discomfort, don’t force it. This isn’t a “no pain, no gain” situation. Forcing or pushing through pain can actually make your pelvic floor more reactive or tense.
If things feel okay, you can slowly glide the trainer tip in another centimeter or two. Most people find that starting with the tip angled toward the front of the body (toward the pubic bone) is a good way to begin.
If you feel a sudden urge to pee, it might be because the tip is pressing on your urethra (the tube that empties your bladder). Just shift the angle of the tip slightly—maybe 5 degrees to the left or right—and that sensation usually goes away.
Exploring Movement and Pressure
Once you’ve inserted the wand a centimeter or two and your body feels settled, you can start to explore different angles. Try:
Angling the wand slightly left or right.
Tilting it up toward the ceiling or down toward the floor.
Rotating the handle slowly clockwise or counterclockwise.
This isn’t about “doing it right” so much as it is about being curious. You’ll probably be able to feel what direction the tip is moving just by tuning in to your body—there’s no need to overthink it.
As you explore, you may come across spots that feel more sensitive or tender. These are often the exact areas where the muscles are holding tension.
When you find a tender point, pause there and apply steady, gentle pressure. Think of it like using a Q-tip—you’re not jabbing, just making contact and letting the area respond.
It’s common for it to take 30, 60, even 90 seconds for that tenderness to change. This feeling of “release” can be a helpful outcome of trigger point work, so be patient: stay with it, keep breathing, and notice if the discomfort starts to ease.
If the pressure becomes too intense, back off slightly. You’re looking for that just right amount of pressure that allows your body to soften into it, not brace against it.
How Deep Should I Go?
There’s no rush to insert the trainer tip as far as you can. In fact, the outermost pelvic floor muscles—those you access with just a centimeter or so of insertion—are often plenty for a first session.
Deeper isn’t necessarily better. As you become more comfortable, you can gradually explore further into the pelvis. Just be sure to adjust your angle as needed; you’ll probably find that tilting more steeply or rotating differently helps you reach deeper areas with less effort.
If you’re noticing that everything feels tender, know that this is common, especially in the beginning. You might want to set a time limit, such as five minutes of internal work, so you don’t overwhelm your tissues.
Over-working tender areas can sometimes cause irritation or soreness later. As you become more accustomed to trigger point work, you’ll be able to self-massage for longer.

Wrapping Up Your Session
When you’re done, remove the Cervu tool slowly and gently. Try not to yank it out—you just spent time helping your tissues relax, and sudden movements can undo some of that good work.
Remove the trainer tip from the handle. Head to the sink and wash the trainer tip again with warm water and unscented soap. If there’s lubricant on the handle, you can wipe it off with a damp cloth or alcohol wipe.
We also recommend urinating after your session to flush the urethra and help prevent irritation. If you have excess lubricant on your vulva, gently wipe it off with a soft cloth or toilet paper. Avoid scrubbing or using anything harsh, especially if your tissues are already sensitive.
Then, if you can, take a few minutes to just rest quietly. Let your body fully absorb the work you’ve just done. Even a few breaths of stillness can help you reintegrate and get the most out of your session.
A Few Gentle Reminders
Performing trigger point work at home isn’t about doing it perfectly. It’s about listening to your body, being patient, and treating yourself with care.
The first few times might feel a little awkward, but it gets easier. The relief many people feel when they find and tackle those tight, tender tissues can be hugely impactful.
Pelvic health support shouldn’t be one-size-fits-all. At Cervu Health, we believe that knowledge, support, and the right tools can make all the difference.
This guide is for educational purposes and is not a substitute for personalized medical advice. If you have a history of pelvic surgery, radiation, or other complex medical conditions, please consult your provider or a pelvic physical therapist before using the Cervu system or any other internal tool.
About the Author

Caitlyn Tivy, PT, DPT, OCS
Dr. Caitlyn Tivy is a pelvic health physical therapist, clinical consultant, and medical writer. As Chief Clinical Officer of Cervu Health, she’s focused on helping Cervu users regain their health and wellbeing after cancer.
Caitlyn believes that all survivors deserve compassionate, inclusive care and access to the most effective recovery tools. She specializes in smashing taboos, centering science, and making complex medical topics easy to understand.

Getting Started With the Cervu System: A Step-by-Step Guide
We get it. If you’re recovering from cancer treatment, your body has been through a lot. Using the Cervu system for the first time can feel overwhelming. Here’s our step-by-step guide to make your first session as comfortable, safe, and supportive as possible.
We get it. If you’re recovering from cancer treatment, your body has been through a lot. If your treatment included pelvic radiation or hormone blockers, your vagina has been through even more. The idea of placing anything inside it probably sounds like the worst idea ever.
Using the Cervu system for the first time can feel overwhelming. You might be dealing with pain, dryness, tightness, or a history of uncomfortable pelvic exams or painful sex. It’s totally understandable to experience feelings of hesitation, anxiety, or even fear.
But here’s the good news: using the Cervu tool can actually help you reduce discomfort and rebuild trust in your body. The keys are starting slow and giving your body and nervous system time to adjust.
At Cervu Health, we’ve worked with many survivors learning how to perform pelvic self-care at home. Here’s our step-by-step guide to make your first session as comfortable, safe, and supportive as possible.
Step 1: Gather Your Supplies
You’ll need:
The Cervu tool: the handle and the smallest trainer tip
A compatible, body-safe lubricant
A soft towel or two
Neutral, hypoallergenic soap
Access to warm, running water

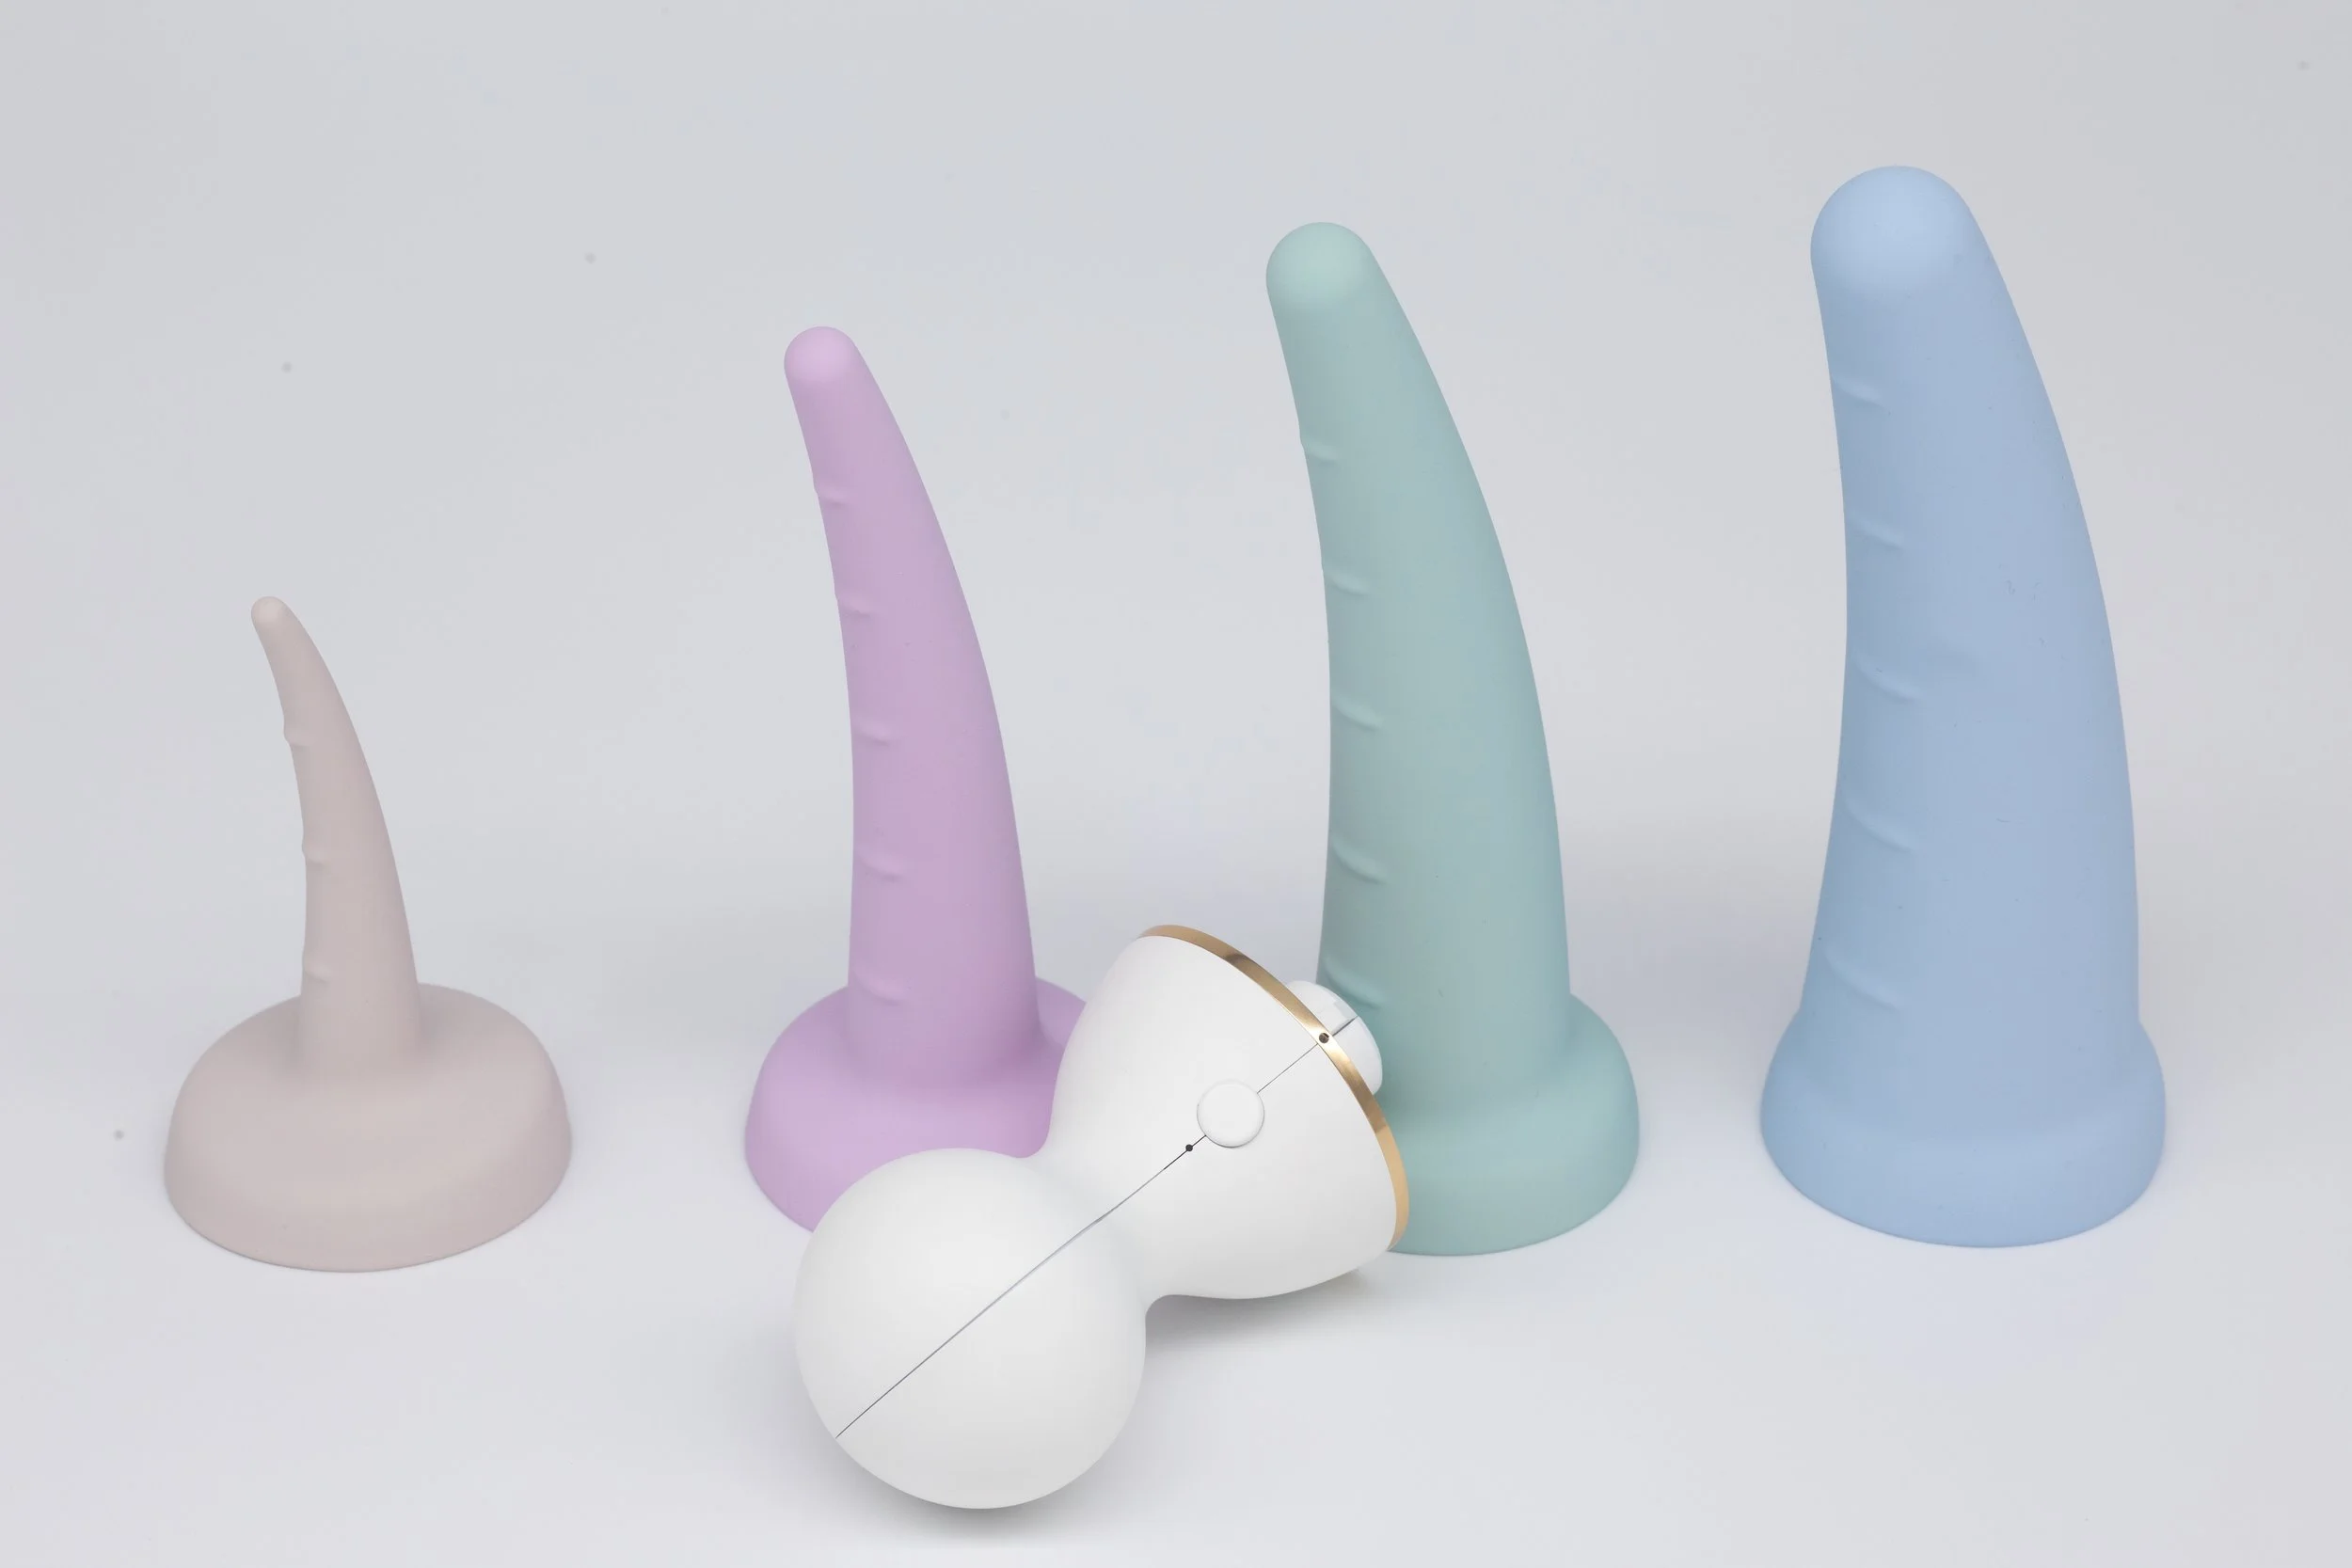
The full Cervu system with 4 progressive trainer tips and a rechargeable, vibrating handle.
Wash the trainer tips before every use, even if your set is brand new. Wash your hands too, using a gentle soap. Thoroughly rinse both your hands and trainers to remove any excess soap.
When it comes to lube, we recommend a water-based lubricant without added scents. Avoid anything labeled “warming” or “tingling”—the chemicals used to create these sensations irritate the vagina. Some brands we love:
Good Clean Love’s BioNude Ultra-Sensitive lubricant
Ah! Yes WB (water-based) lubricant
Slippery Stuff Personal & Clinical lubricant
Other types of lubricant, such as oil- or silicone-based formulations, can be helpful for folks dealing with vaginal dryness. However, you should avoid using these oil- and silicone-based lubes with your Cervu trainer tips, as they can damage the silicone coating.
Bring a couple of clean towels with you to the room where you’ll do your first session. Some people like to have a towel to place under their hips during use: this helps catch any extra lubricant and makes cleanup easier.
Step 2: Set Yourself Up for Success
For your first practice session with the Cervu system, carve out 20-30 minutes just for you. You might not need this much time, but it’s best to give yourself plenty of wiggle room so you don’t feel rushed.
Choose a private, quiet space such as your bedroom or a calm home office. Ideally, you’re somewhere you won’t be interrupted by work, chores, partners, or kids.
Set the mood to help your nervous system settle:
Dim the lights or turn off overhead lights in favor of lower-set lamps.
Set the room temperature to make yourself comfortable: neither too cold nor too hot.
Play soft music or light a candle if that feels grounding and soothing.
Avoid anything overstimulating like watching TV or reading the news, which can subtly increase stress.
You’re not just preparing your body: you’re setting up a positive mental and emotional connection with this new experience.
Step 3: Get Comfortable
Lie down on a supportive, soft surface. Use pillows to prop up so you’re not straining or overstretching. Many people start on their back with knees bent and feet flat, or in a butterfly position with pillows under the thighs.
Make sure you can comfortably reach the base of your pelvis: imagine the hand position you'd use to insert a tampon or wipe after peeing. If your arms feel too short, propping up your upper back with pillows can help you reach more easily.
Your comfort is the most important thing here. You can’t relax if your legs are overstretched or your back is sore. Take your time to get comfortable.
Step 4: Calm Your Body and Mind
Before going further, take a few minutes to breathe and settle into your body. Use a guided meditation or relaxation app if that’s helpful. The goal is to let your body soften and your mind relax.
Rushing is counterproductive here. This stage is all about telling your nervous system, “This is safe. We can take our time.”
Step 5: Begin With the Smallest Trainer
Start with Size 1, the smallest trainer tip in your Cervu set. It’s much better to begin with a tip that is smaller than one that’s too big: you can always size up later. The first session is all about creating a calm, positive first experience.
Hold the trainer in the palm of your hand to warm the tip with your body heat for a few moments. This can make it feel more natural and less startling. Once the tip is warm, attach it to the handle* of the Cervu system.
Then, just rest the tip of the trainer on top of your pubic bone—not at the vaginal opening yet. Just notice how your body responds to the sensation of the trainer being near your pelvis. Are you tensing your glutes? Holding your breath? Clenching your jaw?
These are all common, automatic responses. Just breathe and give your body time to settle. If it helps, remind yourself, “This is safe. We can take our time.”
*You’ll notice that the handle is rechargeable, but don’t worry if you haven’t charged the handle yet. You may not even need the vibration element for your first session.
Step 6: Explore Around the Vaginal Opening
Next, gently touch the tip of the trainer to the crease where your thigh meets your pelvis. Try both sides. One side might feel tighter or more tender than the other, and that’s completely okay.
Notice what your muscles do—particularly your belly, your jaw, and your glutes. Are they relaxed, or did you feel them tense up? If they tightened, take a breath, add a pillow or shift positions to get more comfortable, and try again.
Then, rest the tip of the trainer directly at the vaginal opening, like you would with a tampon—but don’t insert it just yet. You’re still just getting your body used to the presence of the trainer. Again, pause and notice how you’re feeling.
Step 7: Add Lubricant
If things are feeling okay, add a generous amount of lubricant to the tip and one side of the trainer tip. You can use the tip like a paintbrush to spread some lube around the vaginal opening, too.
When in doubt, add more lubricant than you think you need. Over your first few sessions, you’ll get a sense of how much lube is enough.
Step 8: Insert the Tip of the Trainer
When you’re ready, place the trainer back at the vaginal opening. Breathe out gently as you insert the tip of the trainer, about half an inch or less. Again, check in with your body. Did your muscles tense? Did your breath catch?
Pause here. Let your body adjust. If this is as far as you go today, that’s plenty.
If you’re still feeling okay, you can gently tilt the trainer to different angles—side to side or up and down—while noticing how your body responds. One direction may feel tighter or more sensitive. Paying attention to these differences helps you learn what your body is telling you.
From here, you can insert the trainer a little farther—perhaps one to two inches—and repeat the process: pause, breathe, and assess. There's no need to rush. Many people stay at this step for multiple sessions.
Step 9: Let It Sit (Optional)
If everything feels comfortable and you’ve inserted the trainer to a depth that feels okay, you can let it rest inside your vagina for 3–5 minutes. This allows your pelvic muscles more time to relax around the trainer. You can increase this time in future sessions as you get more comfortable.
If your hand and arm need a rest, you can rest the handle on a rolled towel at the base of your pelvis. This will help trainer tip stay in a neutral position while you relax here.
There’s no need to advance to the next size right away, even if the smallest trainer feels easy. Let your body build trust in the process. The goal of the first few sessions isn’t even to stretch your tissues; instead, it’s about creating a sense of safety and ease.
Step 10: Wrap Up With Care
When you’re ready to remove the trainer tip, don’t rush. Gently exhale as you slide it out, and focus on letting your pelvic muscles soften. Be kind to your body during this process.
Clean your trainer tip and your hands again using your gentle soap and warm, running water. Allow the trainer to fully air dry before storing it. If you need to put it away immediately after use, dry it thoroughly with a clean towel.
If the handle has lubricant on it at the end of the sessions, you can wipe it off with a damp towel or alcohol wipe. Avoid submerging the handle in water, as this can damage the internal motor and battery.
We also recommend going to the bathroom to urinate after each session. This helps flush out your urethra, and it’s a convenient way to clean up any remaining lubricant. You can gently clean your vulva with toilet paper or a neutral, body-safe wipe.
Finally, take a few moments to rest quietly before returning to your day. Give your body a chance to absorb the experience and reinforce the idea that this process can feel safe, doable, and even empowering.
At Cervu Health, we know vaginal training is a deeply personal process. If your first session felt tender, awkward, or emotionally heavy—that’s normal. If it went smoothly, that’s great, too! Either way, you’ve already done something important just by showing up for yourself.
We’ll walk you through how to progress with your vaginal trainer routine in a follow-up article. But for now, know that starting slowly, listening to your body, and creating a supportive experience is the best way forward.
Ready to start your healing journey with the Cervu system? Join our waitlist today and be the first to hear when our product is ready for purchase.
This guide is for educational purposes and is not a substitute for personalized medical advice. If you have a history of pelvic surgery, radiation, or other complex medical conditions, please consult your provider or a pelvic physical therapist before using the Cervu system or any other internal tool.
About the Author
Caitlyn Tivy, PT, DPT, OCS
Dr. Caitlyn Tivy is a pelvic health physical therapist, clinical consultant, and medical writer. As Chief Clinical Officer of Cervu Health, she’s focused on helping Cervu users regain their health and wellbeing after cancer. Caitlyn believes that all survivors deserve compassionate, inclusive care and access to the most effective recovery tools. She specializes in smashing taboos, centering science, and making complex medical topics easy to understand.